Monday 15 November 2010

My Pitches for my Final Piece

For my opening sequence I have come up with a couple of ideas of what I am going to create


My first pitch is of a teenage thriller film in the same kind of style as the films 'Scream' and 'Urban Legend', where it begins with a teenage girl saying goodbye to her friends and entering her house which is empty. Camera shots will be from the point of view of someone spying on her from the outside. then she will become paranoid and slightly jumpy at the knock on her front door and then see her open it to reveal that she knows the person at the door. She then invites the person in and and after the door shuts the audience hears a gun shot and a body drop to the floor. To make this seem real, I will add sound effects and use lots of point of view angles and at times make the camera a bit shaky to make the audience believe it is a person looking at her. Also I am not going to reveal the identity of the man as it would give away the mystery of the story. I would need to film this at night to create the creepiness of the film so that it doesn't look silly when she's getting paranoid about being home alone.


My second pitch for a film is of a teenage girl who saves the world everyday, but also has to go to school. I think this would be for the audience of teenage girls as the character is around their age and it would involve a lot of girl talk/problems such as being an outcast at school or not having the perfect relationship. I could get various camera angles and maybe film a typical morning for this girl where she could wake up in the morning, go to school and then have a call to save the world just before one of her maths classes. I would need lots of special effects to film this and maybe a green screen. It would give me an advantage to film this during school as that would be the location and the right time of day. Films that relate to this genre would be a mixture between a film like 'Kick-ass' and 'Superman' where both main characters live a double life and maybe a bit of 'Mean Girls' or 'Angus Thongs and Perfect Snogging' to capture the girly aspect of the film.


Prelim Task - Evaluation

Introduction
For this task we had to create a short scene where camera shots had to include, match on action, shot reverse shot and a 180 degree rule. In our group, (Vicky, Jack and I) we thought up several ideas of what we could do for our scene. We came up with:
- Bumping into somebody at the supermarket - camera shots would be walking into the supermarpket for the match on acton, having the two talking back and forth also getting P.O.V shots over the actors shoulders for the shot reverse shot, and then the 180 degree rule being they stay at the same side of the isle facing the same direction. We found this would be difficult to film as we did not have access to a supermarket and we felt that we could come up with something more easily accessed.
- Wearing the same clothes as somebody - The location of this could have been set anywhere, at school, in the street or at the shopping centre. Camera shots would be walking out of their house/into school/into the shop for the match on action, the two talking into each other
- Forgetting to invite somebody to a meal - This could take place in our cafeteria or make the photo studio look like a restaurant. This way, we could be out of the way from people getting their lunch. Camera shots would be walking into the restaurant and have the two sitting talking
- Walking into the wrong gender toilets - We could produce this at school in some gender assigned toilets. Camera shots would be the person walking into the wrong gender toilets for the m.o.a and having someone in the toilet tell them they are in the wrong toilet for the shot reverse shot and the 180 degree rule.
We decided on choosing the scene 'Forgetting to invite a friend to a meal' as this would be the easiest to film and fit all of the shots in the scene.


The Crew
Vicky and I took on the roles of actresses, as it was really hard to try and find 2 other actresses because of lessons and not having the spare time to help out. I played one of the friends at the meal and Vicky played the character who was not invited but turned up to the restaurant not knowing that they were there. Since we needed 3 actors to play characters to star in the scene and someone to film the scenes, we found another actor who had the free time to help us out, Liam Smith to play the other friend at the restaurant. As a guy would not get involved in this kind of situation (gossiping about friends) Liam's character was described as a bit feminine to help capture the essence of the scene. Jack took the role of being the cameraman in this scene, and since he was not an actor, he had to direct the actors and give them their stage directions to make us all fit in the screen properly and told us when the angles did not look right and we needed to retake that shot.


Preparation
To fully prepare ourselves for filming, we created a storyboard which helped us with stage positions, props and camera angles. We did this by drawing out the scene from a wide shot and then wrote underneath what camera shots would look good when we were filming. This also helped us with stage directions as it gave us something to go off of when Jack was directing us around the stage and it also helped us find what kind of props we would need to make it seem like we were in a restaurant. We found the location to film this inside the school in our photography studio. We thought this would be the best place to film our scenes as it was out of the way of other students and we could change the lighting, the colour of the background and also it was a quiet place to film so we didn't have many distractions. We also created a script to give to the actors to base the scene around although we had to improvise slightly as our scene would be too short. Also we turned the menu's into scripts incase one of us forgot our lines. We did however have a few distractions when other group were acting their scenes outside, we had parts of their dialogue from their scene filmedin ours which didn't help us much.


Filming
When we had set up the scene and was prepared to start filming, we got straight into filming as we had already got basic experience from filming our Opening Remake, we felt like we knew how important it was to not waste time and get straight into filming after getting prepared. Whilst filming, we did come across a few adjustments we could make to improve the scenes. After doing all the filming for our previous task of re-making a film opening, I realized how important it was to plan and manage the time that we had. This encouraged us to plan everything out and follow the plan when filming the scenes and to remain professional through out filming. 


Editing
After learning how to use the basic skills on Premiere Pro while creating my Cityscape edit and the remake of the Reservoir Dogs opening, I felt more confident when using the program, so when we came to edit the Prelim, it didn't take us as long to edit as it did to edit Reservoir Dogs or the City Scape edit. We didn't need to use any special effects or more advanced functions and just used basic tools to edit the footage we had. 


Thursday 28 October 2010

Remake of a Film Opening

Introduction
For this task, we were asked to remake the opening of a film of our choice. In my team was Vicky Rose and Jack Thornton and together we decided to remake the opening of the movie 'Reservoir Dogs' which was created in 1992 and was directed by Quentin Tarantino. We chose this opening because it seemed basic and easy to film as some of the other openings that we looked at had a lot of special effects and we hadn't got the right programs or knowledge to recreate what was going on. Other openings that we looked at were films like, Juno, Saturday Night Fever and She's the Man. After discussing which one to do, we decided that it would be the easiest to do as the camera angles were simple and  the duration of the film wasn't that long so it wouldn't take too long to edit.


Analyzing
Timings
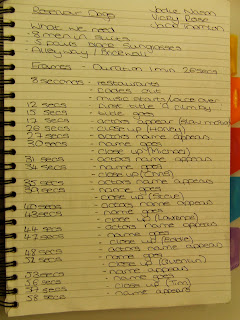
When we were analyzing the opening we first decided to see what we would need to use when filming. These were things like how many actors we would need, if they had any props and if there was a certain dress code they were wearing. We also tried to fit the location right so it would somehow resemble the same as the film. Also we noted when each frame changed, what was in the frame and how long it lasted for. We found this hard to do on the website, www.artofthetitle.com as it didn't give the seconds that it was playing so we found the opening clip on youtube which was much easier as it helped us note the time of when each camera changed. When each screen shot changed, we noted the time it changed and what was going on. So for example when an actor appeared on screen, we would note down the time the appeared, the camera angle and the actors who appeared. We did this so it would be easier for us when we came to do the editing and directing so we knew how long each scene lasted for and which actor was doing what in their close ups.


Titles and Camera Angles
After we did this for the 13 fames that changed, we went back to the beginning of the clip and looked at all the different titles that came up and wrote out in order which titles came up and what they said. We only made one small spelling mistake and corrected it quickly before compressing the file. After we wrote all of these out we all discussed which camera angle was where and how they joined on to each other, for example if one scene dissolved to the next we would note it down and also when noting the camera angle we would link it to the scene to make it easier for us to direct and edit. Most of the close ups we had were to be cut when changing the scene but when we were editing, we noticed the difference it made when we added the Addictive Dissolve and decided to do that for all the close ups as the effect made a better difference than the basic cut.


Actions, Positions and Actors
To make sure we had the correct actions, we made a script of timings and positions for the actors we found. This was challenging as we had to find eight male actors who had free periods, as we were filming the scenes during our media lessons which was during other peoples lessons. When we found the right amount of actors, we gave them the correct props and found that some actors resembled the characters in the film. This is when we decided to cast them due to their resemblence to the actors in the film. Also they brought in the right clothes to wear if they were wearing something other than a suit. When we were looking at the close ups, we all decided that we should have the same actors in the shot as there is on the opening so we wrote down the positions which the characters were walking in. We did this by going on to wikipedia to find the positions easier after it taking so long to figure out when watching the close ups. We figured out who was where in the first scene and the times they appeared or had an action. We also did this for the Alleyway scene when they walk with a sideways profile and then did it again for the positions for when they are walking towards the camera and each one has a close up and then kept the same positions for when they're walking away as the title rolls up. When we noted the actions of the close ups, we wrote which character had which props and how long their scene lasted. Also we added which direction they were looking in and if they had any actions like putting sunglasses on or smoking a cigarette. As each close up  lasted for 4 seconds in slow motion, we had to make sure the characters did the actions in half the time so we could fit it in the scene to slow it down and still get the actions. For some actors, we found this took a couple of takes as when filming, they would make the movement while being too close to the camera or that the movement didn't look right at all.

Storyboard and Shotlist
While me and Vicky were noting the positions and actions, Jack took charge of creating a Storyboard. To do this he drew in the six boxes provided, where the actors would be from the cameras prospective. As this was a rough drawing, he decided to draw it simply by using detailed stickmen. Along with Vicky, they both created a shotlist using _____ this is where they took screen shots of each scene change in the opening scenes. This proved easier than the storyboard as it was quick and easy and you were able to detail each screen shot with what camera angle was used, who was in the shot and which scene it was.

Filming
PreparationBefore starting the filming, each person in our groups were given a specific role to make things easier on us. Jack took a role as one of the actors as we couldn't find the right amount of volunteers, Vicky took the role of filming with the camcorder and I took the role of directing the cast with their positions and timings. With our roles set we found our locations for each scene that sort of resembled the scenary in the opening without leaving school grounds. For the first scene in the restaurant, we chose to film in our school cafeteria and set the tables and chairs to match the ones in the film. We then chose to do the alleyway scene behind our Sports Hall which was good for our cast as this area is usually empty and we wouldn't be getting disturbed or have people get in the way of our shots. We used this location for the close ups and the last scene as it made sense that it was outside and we wouldn't be getting disturbed. We were then given our HD camcorder and sent off to film our scenes. 

Summery of Filming
Whilst filming each scene I noticed how important it was to plan everything before we got started filming. For example the we only had a couple of lessons to film and edit so to get the time scaled right, we had to make sure we were professional about the whole thing and not goof around. We also decided that since everyone was wearing the same clothes in the opening, we needed to get the same actors to wear the same outfits for each scene they were in. We found this easiest to just film all the scene on the first lesson and then edit it in the next couple we had. As we found that not everything would go how we planned, we needed to be patient to give enough time to re-correct it or wait until it smoothed out. This was mainly an issue with the weather and the people around us although we were quite lucky with having a nice bit of weather after it all cleared up.


Editing
Setting up a Project and Importing and Exporting Files
When editing our opening scenes, we used a program called Adobe Premiere Pro. This program is designed to edit and create movie clips, it is very straight forward after you know the basic tools and features of this program. Since we had already had experience with the program by creating our 'City Scape Film Openings' we were already familiar with most of the features. Since we were also remaking an film opening, we had a template to go by as we had the clip in the background. This made it easier for us to get the right timings and helped us to find out when each scene faded out. The first thing we did after we connected our camcorder to the computer was to import the recordings we had made onto the computer. We did this by using ____ to cut where necessary to make all files shorter to make it easier to edit our work. we then had to import the files into our document so we could edit them.

 Cutting clips, Unlinking Sound and Changing Speeds
When we were editing, we found that there were certain parts of the clips that we didn't need. To shorten the scenes, we used a tool called 'cut'. This allowed us to cut the clip into a two sections and remove the part we didn't want. As there was no speech or sound, other than the voice over or the music, we had to unlink the sound we recorded whilst filming the scenes. We did this by right clicking on the clip, and going down to the feature 'Unlink Sound'. This feature let us remove the sound from the clip allowing us to delete or move the sound. Since in the film, the characters all moved in slow motion, we had to change the speed of them moving, we did this much like how we unlinked the sound, but we instead of going to 'Unlink Sound' we went to the feature 'Speed/Duration'. This feature allowed us to speed up the scene or slow it down and since the characters in the movie had an action, we had to slow down the scene but still showing the actors actions. This proved to be easier than it started off to be.

Scaling and Resizing Clips and Titles and Fonts
As some of the clips appeared to be too small for the screen, we had to make sure that each scene was the same height and width. To change the size of the clip, we went to 'Window;Effects Control;Motion Control' so we could resize and move the scene to anywhere in the frame. We found this an important tool when we were comparing the two openings and realised we had to crop some of the scene out of the frame to make it appear the same. When we looked at adding in the titles, we had to make sure that the size and colour of the fonts were somewhat the same otherwise the same effect wouldn't have been given. Luckily the font used in the film was identical to one we had on the program and all we needed to do was get them the same colour and title and move them to the right positions. 

Voice Over and Music
Whilst Jack and Vicky were inserting the titles, we decided that we should add in the voice over to really make it our opening. So I recorded one of our music teachers repeating the script which we had gotten from the film, into a microphone. We used professional equipment and software to do this using a program called Synergy Radio Broadcasting and we used a radio system to record and save the file onto a memory stick. We then listened into the original voiceover and heard that we needed to slow down the voice over as he was speaking to fast for the opening. We only adjusted it slightly so his voice didn't muffle or change. 


Final Piece
I am pleased with how our opening turned out as it proves to be very identical to the original opening which gives the feel that it was done professionally. I learnt a lot from this task as it taught me how to film, direct and edit correctly and I also became more familiar with the program Premiere Pro and feel more confident when using it. I had also learnt a lot of techniques and found the importance of planning things out before rushing into a project. Doing this task will help me in future projects and tasks as it was a good experience and I had enjoyed making and producing this piece. Below is the two separate openings and the comparison.

Thursday 23 September 2010

Analyzing a Film Opening

For this task, I was asked to view 3 different film openings and analyze at least one of my 3 choices. I have chosen to look at Sweeney Todd which was directed by Tim Burton. Since I've always been a fan of his work, I find that the opening to this film is very interesting approach to start off a film. The first impression you get from watching this opening is suspense, as is starts off during the night with ghostly, dark music and then a sudden rush of thunder and rain begins to mix in with the non-diegetic sound. The camera angle continues a following shot over buildings and finally tilts down to the barbers chair. Then the camera continues a following shot on a trail of blood that goes keeps moving down to the cellar. The reason this creates suspense is because as we follow the camera angle, we gradually find out what is in store for the film and as we follow the blood, we get more of an image of what to expect in this film. What also creates tension and horror is the diegetic sound used for the blood and we hear it squelch and drip throughout its path.
As the opening is clearly animated, it gives off the feel that it is real as each object looks perfectly realistic however as it is odd that the blood is moving in such a careful path towards the cellar, we know that this opening has definitely been edited. What isn't shown is very many cuts where the scene changes completely as the main camera angle used is a following, the camera captures most of what is going on without adding in too many cuts. 


Monday 20 September 2010

CityScape Film Opening

My CityScape Opening
For this task, we were asked to create a Cityscape Film Opening by using imported clips of everyday activities in London. To create the opening, we used a program called Adobe Premiere Pro which is a professional program designed to create and edit movie and sound clips. As it was the first time I was using this program, I found some of the features confusing and found that it seemed a bit complicated. However when I started getting into the editing, I picked up on using different tools and features, such as:
The Cutting Tool - I used this tool to slice clips where I wanted them to end if they were too long or start if I wanted a different perspective. This tool is used commonly in editing as there will always be part of films which aren't wanted or are too long for the scene.
Unlinking Sound - I used this if there was a digetic sound within the clip which I didn't want, I could get rid of. I did this by right-clicking and selecting the 'Unlink Sound' feature.
Speed/Duration - If I came across a clip or a part of my film I wanted to speed up or be slowed down, then this is the feature I would use. To use this, I right-clicked and selected 'Speed/Duration'.
Resizing - As most of my clips were too small for the screen, I had to re-size them to make them fit the whole screen, I did this by going through 'Window;Effects Control;Motion Control' and then resizing them like I would with a normal picture.

When I finished editing and adding the final touches to my opening, I compressed the file and sent it to my Media teacher to be put onto YouTube. Below is my final piece which I am pleased with as it is my first piece used in Premiere Pro, but if I were to remake this, I would add more of a selection of effects and maybe change around a few clips to make it seem more interesting. However as it was my first attempt, I think it's fine the way it is.


Sequence of Six


For this task, we were asked to go off in pairs and create a sequence of six to tell a story. In my sequence, I used a digital camera to take photos of my partner Vicky, walking though a corridor, stopping to take a sip of her drink and carrying on down the corridor. To produce this piece, I uploaded the photos to my computer and used the program Microsoft Powerpoint. In the diagram above, I took notes of what each step was and why I chose to take my photo from that angle, what I could have dont better and what works with it.

Monday 13 September 2010

Mood Board Opening


For this task, we looked at the opening scenes for the film, Trainspotting. We where then asked to create a moodboard on powerpoint, containing parts of which were mentioned in the opening. For example he mentions, choose a life, a job, a career and a famile so in my moodboard, I showed him as someone who doesn't have a way in life and ends up doing things that would cause trouble, smoking, taking drugs, binge drinking and stealing.  I found images on the Internet which show people doing these tasks and what makes the moodboard look bad is that none of the images look pleasent.